According to statistics, more than half of all customers prefer to talk to someone in real-time. This means that one of the best ways to increase customer satisfaction is by installing a live chat solution.
That is all well and good, but what if your live chat service offers the features that can only handle simple queries? In case a user submits a query that is hard to handle over the standard live chat system, you might be in a tight spot. This is where 3CX Live Chat comes into play.
This text will cover the 3CX Live Chat plugin in detail, together with its accompanying 3CX StartUP ‘cloud-native’ system and the web client. Let’s start by talking about the live chat solution in general.
3CX Live Chat
3CX Live Chat is one of the easiest and simplest ways of turning visitors into new leads. Upon landing on your website, you can give them a customized greeting according to business working hours and other preferences. While browsing your products or services, you can give your visitors real-time advice, which can clear doubts and increase customer retention.
Also, if an agent was involved in communication, the visitor can rate the agent through the live chat rating system.
Audio and video calls
There’s one feature that is very important and one that differentiates 3CX Live Chat from its competitors. If your visitors still have doubts or uncertainties following a conversation with the agent over live chat, they can quickly switch to a voice call or even a video call. The voice and video calls are conducted over your browser which means that there are no extra costs for the business or the customer
This is the quickest way of resolving your customer’s issues. You also save a lot of time for your customers; they won’t have to go down to the contacts section to see which phone they have to call to get the necessary information, or have to repeat their issue to multiple different operators. The call button is right there, in the chat window ready to connect you to the same agent in just a click of a button. Many customers will be thankful for this lower contact barrier and will thus be more inclined to use the service. Since the calls are completed over the browser it will result in no additional cost for the business or the customer.
Integrations and chat features
The chat system is also available on many different platforms, most notably WordPress, Drupal, Joomla, and many others. Another awesome feature of this system, which will undoubtedly save you a lot of time and headache, is its widespread integration. The system offers full support for Facebook and SMS messaging.
If you’re getting a lot of messages from different visitors, you can easily manage them with the queue-based group handling of chats. This is an extremely helpful option for your agents. When it comes to ticket submission, they can automatically be assigned to the first agent that responds to a given chat. To get proper information and responses, the visitor can even select the department they want to speak to. The system can also assign messages to specific agents or groups of agents automatically to ensure every chat, call or video call is answered.
Fees and hosting
The 3CX Live Chat plugin is part of the 3CX StartUP system that comes with 3CX Web Client. It can be obtained for free making it available to anyone looking to enhance their communication methods with their website visitors. It is hosted on a shared instance and can support up to 10 individual users with tools such as video conferencing, a ring group, an auto-attendant, and mobile apps.
However, we need to stress that there is also an option to upgrade to 3CX StartUP PRO that offers the same features as the free edition and includes a few extras for a more tailored experience such as multi-level IVR, call queues and reporting. It also has the option to accommodate a team of up to 20 users, which gives a little more room for a growing business to play around with. For larger businesses and installations there is a range of competitive pricing plans available based on the number of simultaneous calls.
When it comes to deployment options, there are three different types. Firstly we have the aforementioned 3CX StartUP which is a hosted option where the updates and hosting are managed directly by the 3CX. The second and the third options are the ones where you are involved in the installation process.
You can choose to deploy the tool in your cloud, using Amazon, Google, Azure, or other providers, or you could deploy it on-premise on systems that run Windows or Linux. Another interesting option is deploying its owner Raspberry Pi.
With so many different options, the tool is extremely flexible and can be perfect for many businesses.
Setup
The setup is done through the browser, which will then be used to access the web client:
- Sign up for your free account.
- Add your user or agents to the system and assign them roles that will determine their access once the system goes live. They will answer chat messages and use other system features.
- Determine if you’ll use a SIP Trunk, which is used for inbound and outbound calls. If you’ll be using the system just for Live Chat and internal communication simply skip this part and click on “Next”.
- Now you can start setting up your live chat by choosing the option “Yes” and selecting if you have a WordPress website or not. Enter your website URL and click “Set”.

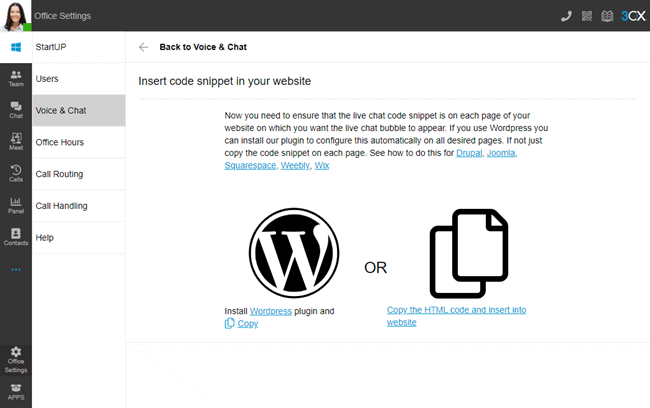
- You need to link the system to the plugin, so download and activate the plugin and then copy the 3CX Talk URL and save it for a later stage. The 3CX Talk link is what is used to connect your website to your StartUP account. Because it’s all done through the browser, there’s no need for a telephone number to call.
- You’re done. Through the “Login” button you can access your dedicated 3CX Web Client which is the place your customization options and chat messages are located.
Once your account is created and you can access the Web Client, it’s easy to set up your Live Chat right away:
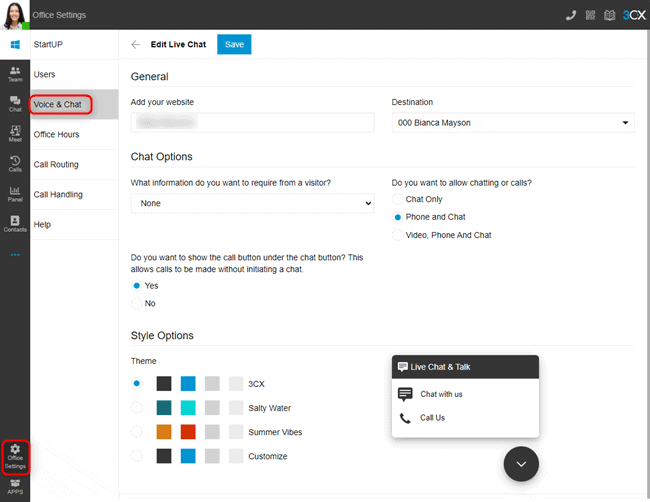
- To set up live chat so that calls and messages can be answered from the Web Client, go to “Office Settings > Voice & Chat” and click on the pencil icon.
- Your website address will already be populated from the wizard process, but you can amend this if required.
- The “Destination” field shows where live chat messages or calls will be sent. To amend the “Destination”, navigate to “Office Settings > Call Routing” and choose your destination. By default, the live chat will route to a ring group.
- Under the “Chat Options” section, use the drop-down selection to choose what information visitors need to provide you with.
- Use the radio buttons to choose if you want to allow “Chat Only”, “Phone and Chat”, or “Video, Phone, and Chat”.
- If you want the option for “Call Us” to be displayed immediately on the chat bubble, use the radio button to show or hide the option.
- Under “Style Options” choose from one of the 3 pre-defined themes or select “Customize”. For the last option, click on each of the color tiles and use the pop-up color picker or enter your RGB numbers. This will allow you to fully modify the theme to your frontend theme.
- Use the preview of the chat bubble to interact and test the functionality, essentially acting as the visitor. Click “Save” and you’re ready to go.
Any way you choose to configure the finer details, you’ll once again return to your WordPress backend and set up how the live chat will function on your site.
First you need to setup the plugin before you can connect it to the Web Client and use it fully:

- Log in to the admin panel of your WordPress website
- Navigate to “Plugins” and click “Add New” at the top of the page
- Click on “Upload Plugin” at the top and choose the file you downloaded during the sign-up process beforehand. You can also get this from the Web Client in “Office Settings > Voice & Chat” and click the ‘i’ icon next to the pencil icon. Click “Install Now”.
- Once installed, click on “3CX Live Chat NextGen” in the sidebar
- Paste the URL you copied earlier (the 3CX Talk URL). If you haven’t copied it, you can find it again in the Web Client in “Office Settings > Voice & Chat” under the “Information” field or within the confirmation email sent during the setup process.
- Either tick the box to show the chat on all pages or use the tick boxes below to select individual pages. Finally, click “Save Changes” and you’re done.
Let’s, therefore, focus on the live chat plugin for WordPress. In the example shown in the picture, we can see that the live chat has two different options, a “Chat with us” option and a “Call us” option. To access these functionalities, you have to click on the little chat bubble in the bottom right corner of the example website.
Now, as with any quality plugin, there are a lot of customization options for changing how, where, and what is presented in the chat window. There are multiple setting sections for this plugin. We will now go to do settings options and see how they affect the plugin’s appearance and behavior.
General Settings
As the name implies, this option contains most of the general settings relating to the plugin, such as enabling or disabling the chat option and excluding it from the Home and Archive pages. If that’s not enough customization for you, you can pick and choose which pages will have the chat window as well.
Chatbox
This is where you are going to be customizing the appearance of the chatbox on the website. In this section, there are options such as alignment, automatic chat box pop-up, chatbox height, and what to display in the chatbox. You can also customize the icon, logo, and the agent’s default picture. Additionally, there is an option to include Facebook and Twitter URLs.
Offline Messages
What are you supposed to do when someone is messaging you outside of your usual business hours? You could use the offline messaging feature. In this section, you can set up various pre-recorded text messages. You can customize the message that will pop up when someone opens the chatting window while your agents are offline. After sending a message, the visitor will receive a message notifying them that their query has been received.
Styling
The Styling section, as its name suggests, is responsible for the appearance of the chatbox. Here you can choose the color theme of the chatbox and customize various functional buttons. There are four different animation options for the chatbox: slide up, slide from the side, fade-in, and no animation option.
Chat operating hours
This panel allows you to customize the operating hours of the live chatbox. You can easily customize the schedule for each day of the week. This is useful if you only want to have your chat box available when your agents are working.
Advanced Features
Here you can set up Advanced chat features. The most notable option is choosing which services you want to be included. Do you only want to chat functionality or the whole deal, video, phone, chat, or something in between?
Gutenberg Blocks
As the name already suggests, this section of the settings is related to customizing Gutenberg Blocks. You can enable, change their size, select and customize the logo icon and even use a custom HTML template.
Embed Code
This tab contains the code that corresponds to your chat box settings. There is a download button below the code preview, where you can get the CallUs.js file. This makes it quite easy to host it within your site server.
The 3CX Web Client
As we’ve mentioned a couple of times by now, along with the plugin you’ll be able to access your live chat messages via 3CX Web Client.
The web client will be your all-in-one communications interface that features CRM, Facebook messages, and SMS integration. The client is also the place where all these messages are traced, ensuring your site isn’t slowed down by having to run processes in the background from WP.
Taking aside the resource aspects which don’t necessarily need to apply to every site, two major advantages are universal. The web client provides next-level accessibility and more streamlined navigation.
Because the 3CX StartUP is a“cloud native”system the client can effortlessly access it from any device, which isn’t the case with WordPress, as anyone who’s had to work with it on a phone will tell you. Since we’re always on the go nowadays, having a service that’s so easily accessible everywhere goes a long way in making your life as a site manager easier.
Navigation isn’t something that pops to mind when you think about everything that’s critically important for your site, but it is something that could waste your time and hamper your work. Just imagine having to use multiple apps or plugins that are unified here – you’d spend half your time switching from one tab or window to the next just to handle everything. This would ultimately lead to a higher chance of mistakes that could take place. With the client you’ll easily add users, open chats, start calls or video meetings, and much more, all in one place.
Conclusion
To summarize, the 3CX Live Chat is a powerful arsenal of tools aimed at solving the communication problems between the website visitors and the company offering goods or services on the said website. The multichannel integration and the offering of both audio and video calls are something that separates this tool from the competition. There is also a plethora of security options that will ease the minds of even the weariest off users. You can only allow certain country codes, separated by a continent, change admin credentials, blacklist unwanted numbers and prank callers, and much more.
And the best thing that we have to mention once again is that you can use it for free. Considering the level of customization, adaptivity, and usefulness that this tool provides, we highly recommend that you give it a try.