Mostly, the WordPress users encounters the frustrating error that is “Upload : Failed to write file to disk” error. You get this error whenever you upload files in WordPress.
Why Failed to Write File to Disk Error Occurs?
There are various reasons for the occurrence of this error. The most common reasons are the incorrect file permissions. As you know, based on the files and folders permissions the web server controls the access to the files. The files and folder can’t write on the server if it finds any single incorrect permissions.
You might get following error messages when you upload any image or any files from WordPress admin area:
Unable to create directory wp-content/uploads/2016/03. Is the directory writable by the server?

WordPress has failed to upload any file due to the error in writing file to disk
Remove WordPress Upload Error “Failed to Write File to Disk”
Step 1: Using FTP client software

Here, you will need a FTP client software in order to change the files permissions of your website. The most common application is FileZilla which is free and easy to use. If you use CPanel from web hosting provider, you can access the file permissions from the File Manager.
Note: You must need FTP login credentials from the web host. If you haven’t this information then you need to contact the hosting company.
Step 2: Accessing File Permissions
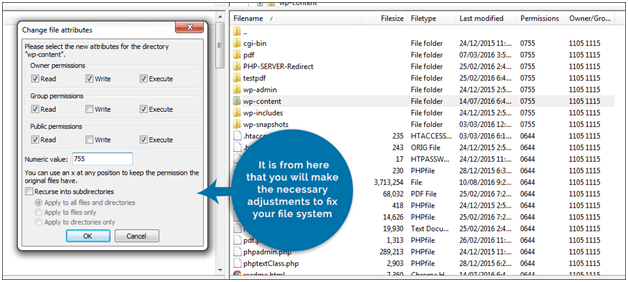
So, here I am assuming that you have accessed website’s system with the help of FTP program. You need to find the folder wp-content where the number of files get stored. Select the file permissions by right clicking on the folder and you will get a new window named as Change file attributes. So, here you are going to make adjustments according to the file system you want to set.
Step 3: Change the numeric value of folders
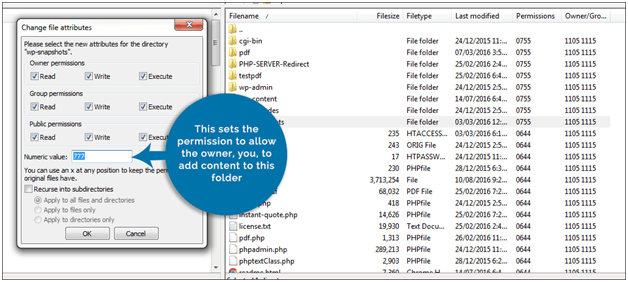
Here, you need to find the text field which is labeled as Numeric Value. What you need to do here is to change the number of the field to 755. If you are just temporarily testing the system, you can change the numeric value to 777. However, while changing the numeric value to 755, it just not only give you access but also make the website available for others to access to the above folders as well.
You also need to check the Recurse into sub directories option so that whatever the changes will be done in wp-content, the subdirectories will also get changed. Select the Apply to directories only option which is at the bottom.
Step 4: Change the numeric value of files
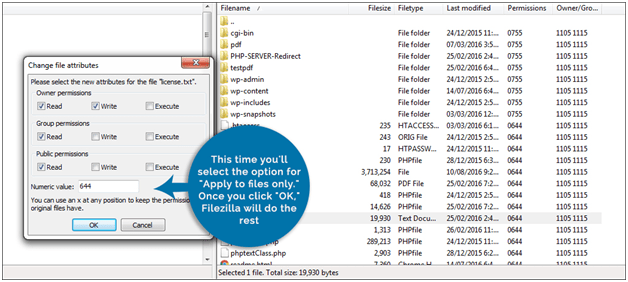
As we have done with folders, now it’s time to correctly set the files as well. You need to right click on the folder named as wp-content and do change the file permissions. Now, what you need to do is to change the number to 644. You will select the option for Apply to files only.
Step 5: Check the Temporary file directory
I don’t think that there is any step left to fix WordPress “Failed to Write File to Disk” error. As you have set the file permissions, you are now able to upload files to WordPress.
If in case you are not able to upload then you need to check out temporary file directory, it may get full. You may be knowing that the WordPress during the file transfers uses temporary file directory in PHP. To get them empty out of the directory contact to the web host.
Conclusion
The above methods are just simple stairs you need to climb to make the permissions according to which failed to write file to disk error will get resolved. I hope this article helped you in fixing the upload : Failed to Write File to Disk error.
Comments are closed.