Almost 70% of WordPress site owners face the problem of WordPress not sending out emails either to them or their users. And considering how important the information in those emails can be, naturally, every site owner wants to get to the bottom of this issue.
Your #WordPress site isn't sending #emails to you or your users? This article has the solution to your problems! Click To TweetIf you are one of them and are currently experiencing this problem, then you came to the right place. Because in this article we will discuss why this issue happens in the first place and will go over two tried and true methods of resolving it regardless of what hosting provider you might be using.
So if that is the type of information you came looking for, keep on reading!
Why are you facing this issue?
This question is a very important one because in some situations WordPress emails can be what makes or break your business. How?
Well, for example, if you are an eCommerce website, emails will be the method you use to send out receipts to your customers, and if that functionality is out of service, then you can assume that your customers might get frustrated, worried and even might see your site as sketchy.

Also, if you have a website that hosts quite a big number of users, users with login credentials, without emails there is no way in which they can receive registration and password reset emails.
Those are not the only two situations in which this issue could put your business in jeopardy. But let’s go back to the question at hand, which is why the emails are not being sent out.
Like with most WordPress issues, there could be a number of reasons why this happens, but there are two that seem to be the case for most sites.
- Your shared server environment has a bad reputation
- Your SMTP server isn’t properly configured or set up at all
Since we know that just listing the problems without giving you the appropriate explanations as to how to resolve them doesn’t mean much to you, we will dedicate the rest of the article to talking about what you should do if you know/suspect that one of the above-mentioned reasons is causing the issue on your site.
But first, test your email services!
Before trying out any resolution methods for this error, you should first run a test to see if your emails really aren’t being sent out.
This can be done with any free email service checking plugin. And a good option is the Check Email plugin, which is just a basic tool designed to test if a WordPress installation or a server is capable of sending emails.
Once you install the plugin, go into your Tools menu, find the “Check Email” option, and click on it. You will then be taken to the plugin’s dedicated page on your dashboard where you should enter an email address to which a test email should be sent.
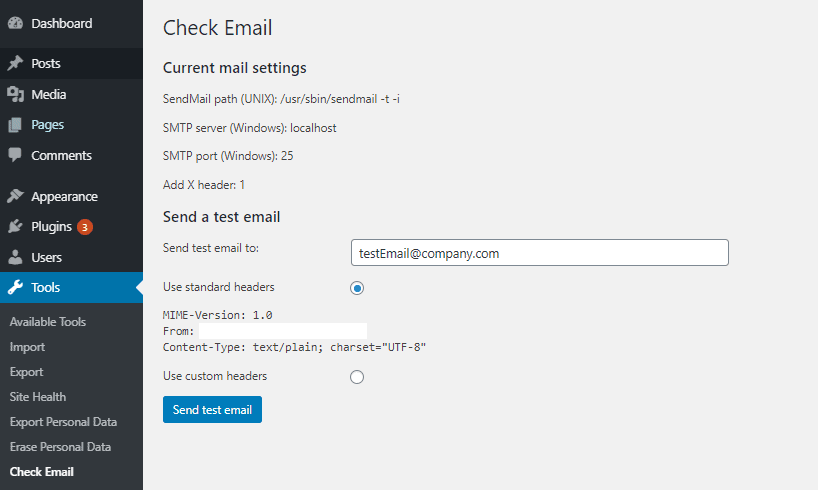
After you click the “Send test email” button, you will get a confirmation notice and you can then proceed to see if you got the email.
The email should have a subject line along the lines of “Test email from https://yourdomain.com.” If the email is not in your main inbox folder, make sure to check your spam or junk mail folders as well.
In case you received the email that means that WordPress can send emails normally from your web server but there might be a misconfiguration or an incompatibility with the plugin you use to send out emails for completed purchases, filled-out contact forms, etc.. In those instances, you can always reach out to the plugin support team for help.
What to do if you think your shared server environment has a bad rep?
Although being on a shared server isn’t a bad thing, especially from a financial standpoint, sometimes it can lead to problems with sending out emails, and the worst thing is, it might not even be your fault.
When you are sharing servers, it is very likely that your site’s SMTP server is sharing your sender reputation with all of the other sites on the server.

Now you might be thinking, “what in God’s name is an SMTP server?”. Don’t worry, we knew you were going to ask so we prepared the explanation just in case.
SMTP stands for Simple Mail Transfer Protocol and is a standard in the industry for sending out emails. SMTP is very useful and efficient thanks to its authentication which results in very high email deliverability.
Okay, now that we got that out of the way, let’s go back to the shared hosting issue.
If your SMTP server is sharing your sender reputation that might cause your email deliverability to significantly decrease. Why?
Well, since more than one site is on the server, there is a high chance that at least one of those sites has bad email sending practices. For instance, it could be selling emails to purchased email lists, getting tons of complaints, and having huge bounce rates.
What this means is that even if you are following all the best email sending practices to a T, you might be getting the “WordPress not sending emails” error thanks to someone else.
Luckily, there is a solution for this mess as well, or to be more specific two solutions.
You can either get a Dedicated IP address or find a new shared hosting environment in which the hosting provider keeps all of the senders in check and makes sure your collective sender reputation stays squeaky clean.
What to do if your SMTP server isn’t configured properly or set up at all?
The other most common reasons for this issue arising are also related to the SMPT server we just talked about, just in a different way. And now we are going to tell you exactly how.
It is not rare that the SMTP server isn’t properly configured. Meaning there is something wrong with its authentication, basic settings, or SPF records.
Additionally, some sites use don’t use the SMPT server to send emails, instead, they use the PHP mail function. So it can happen that the sed PHP function is either disabled on just hasn’t been properly configured.
In both of the just-mentioned cases, problems can be bypassed by properly setting an SMTP server using a WordPress plugin.
The process of configuring a (third-party) SMTP server in WordPress
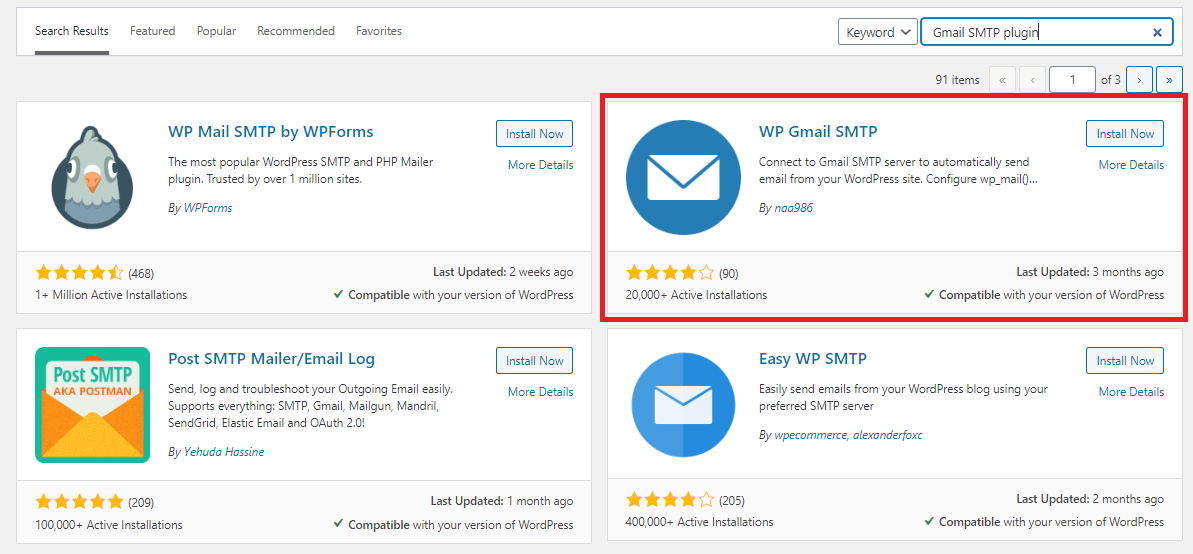
For your SMTP plugin, our recommendation would be the Gmail SMTP plugin, but you are free to choose any other one you prefer. We are pretty sure the configuration process will be similar.
Install the plugin
The plugin installation is like any other, all you need to do is go into the Plugins section of your WordPress dashboard, type in “Gmail SMTP” in the search box, and click “Install Now”. After that just activate the plugin to get it up and running.
Set up and authorize the plugin
In order for the plugin to be able to send emails using your Gmail account, you have to authorize it.
This is done by going to the Google App creation page, and logging in with the Google account you intend to use to send our emails.
After clicking “Yes” for both items on the Register your application page, click “Agree and Continue”.
On the next page, click on the “Go to credentials” button. Then you should be taken to the “Add credentials” page, on which you should leave the first option set to “Gmail API”, the second one to “Web browser (Javascript)” and the third one to “User data”.
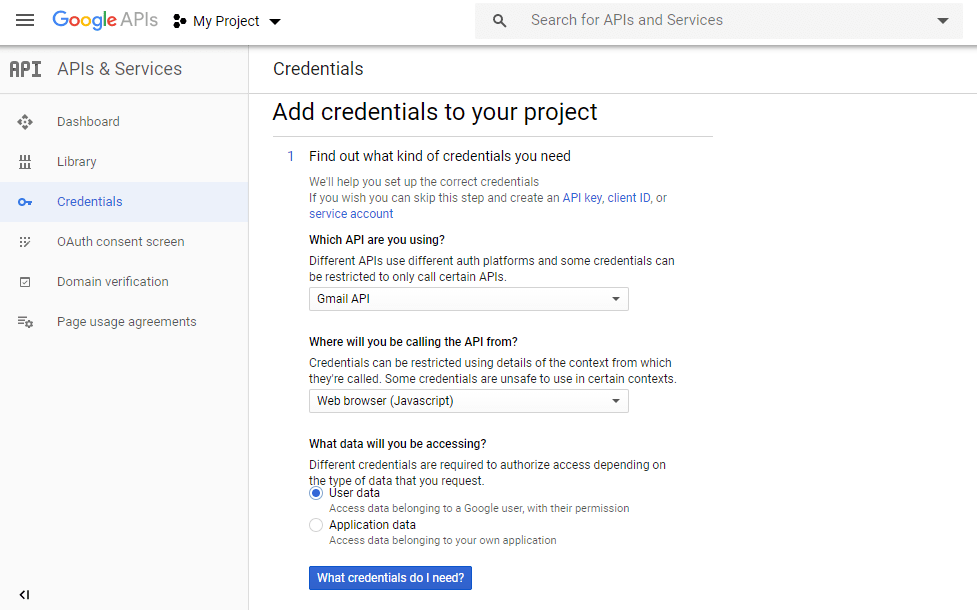
Next, click the “What credentials do I need” button.
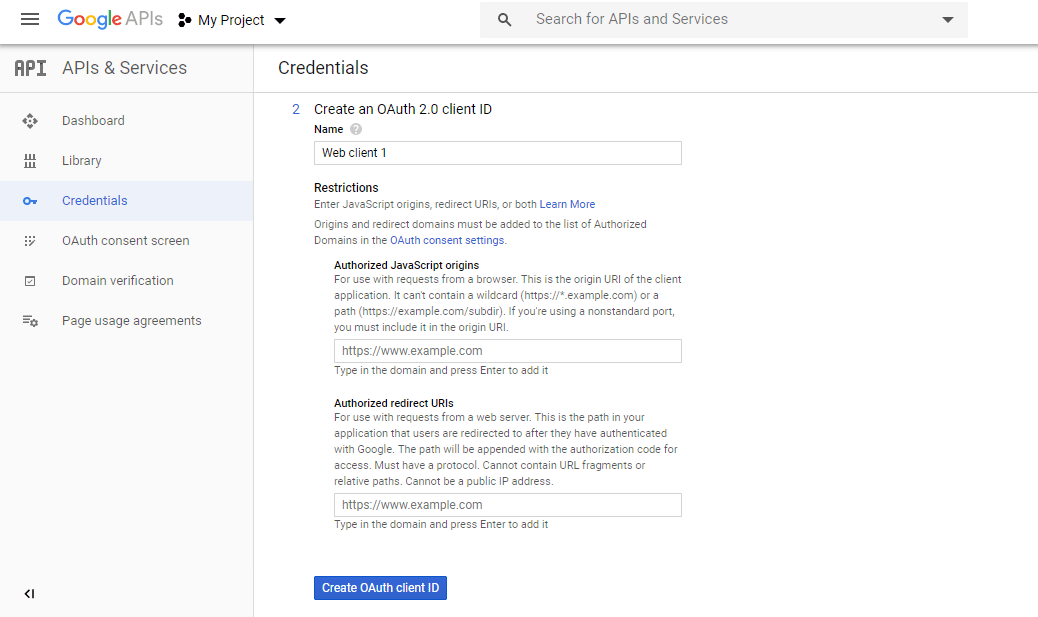
On the following page you are taken to, enter a name for your authorization client and your site’s URL in the “Authorized Javascript origins” input field.
The “Authorized Redirect URIs” you’ll be asked to provide on the Credentials page, can be found on your Gmail SMTP plugin page. Go there and copy it but be sure you copy the entire link.
Once you have done that, click on “Create QAuth Client ID”.
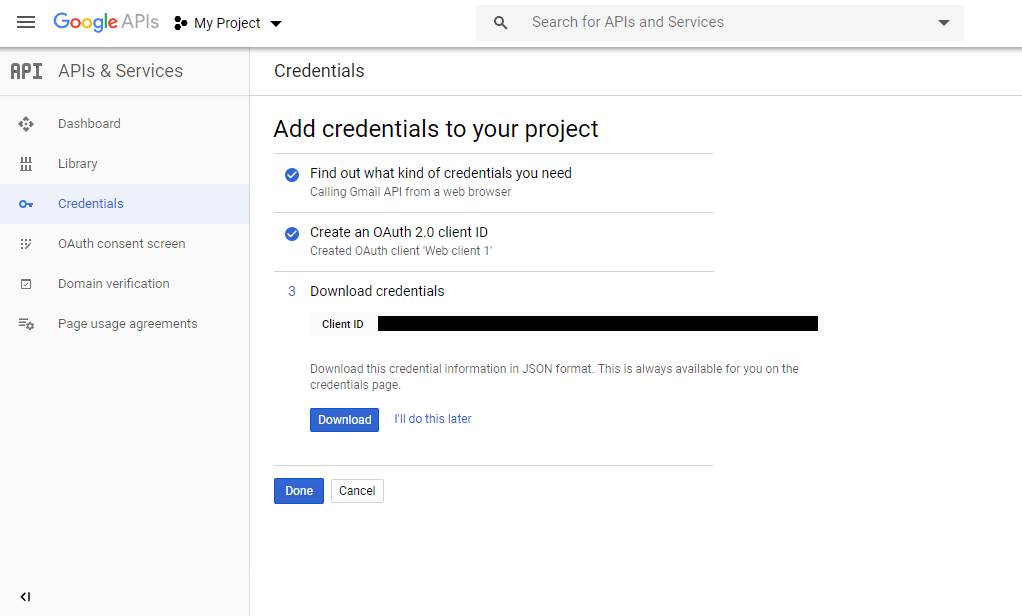
Next, on the page you are now, set the email address to the one you want to use, and enter a product name. Then, click “Continue”.
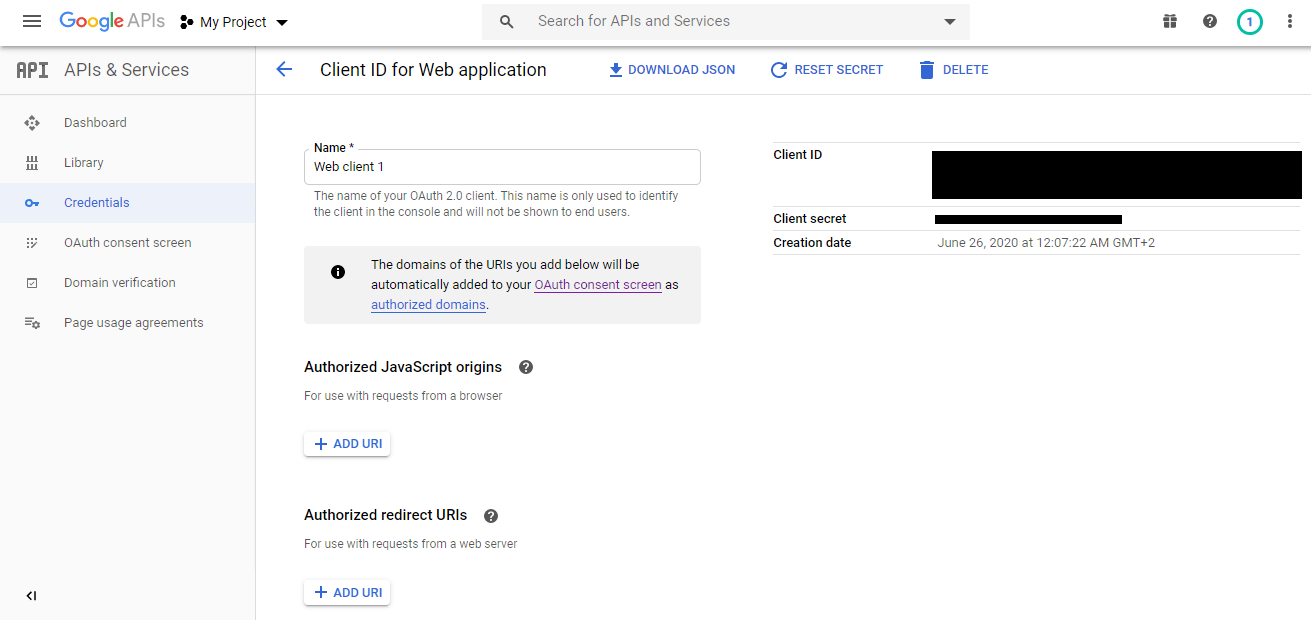
At this point, you should be taken back to the Credentials page, where you should click on the name of the credentials you just created.
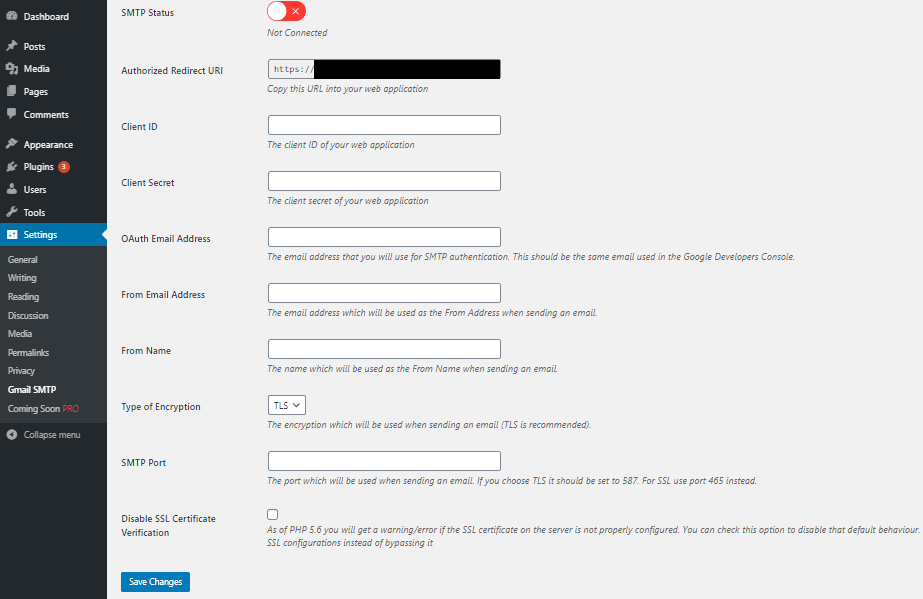
Now, on the page dedicated to those credentials, copy the “Client ID” and “Client Secret”, and paste them in their corresponding input boxes in the Gmail SMTP plugin settings page.
Also on the Gmail SMTP plugin settings page enter the Gmail address you are using in the “OAuth Email Address” and “From Email Address” input fields.
The “From Name” field should be filled out with the name that you want to show when a person receives your message.
For the “Type of Encryption” setting, select TLS, and enter 587 in the “SMTP Port” input filed.
If you do not use an SSL certificate on your server (although we very much recommend that you do, and leave this option unchecked), mark the “Disable SSL Certificate Verification” checkbox.
Finally, on this page, click “Save Changes”, and then a “Grant Permission” button should appear which you should of course click on.
If by any chance you get a warning message you that the app is not verified, click on “Advanced” and then the Go to link. You should be taken to an authorization page, where you should click “Allow”.
After that, on your plugin setting page, there should be a message saying “Access Granted Successfully” and the SMTP Status should now be “Connected”.
And with that, your Gmail SMTP plugin should be successfully configured and should allow you to send emails without any issues and without seeing the “WordPress not sending emails” error.
P.S. Since we know that some of you prefer video tutorials more than these text and image ones, here is the WordPress Gmail SMTP Plugin Setup tutorial in video form.
Conclusion
We hope our explanations will help you get rid of the pesky error that was the focus of this article. Although at first, it might have seemed like the end of the world, as you saw, this error is nothing that can’t be handled with a bit of time, focus, and effort.
Good luck, and make sure you remember to follow all of our instructions carefully!