


If you are a new WordPress user and you are facing multiple problems while setting up WordPress on your site, then you are in good hands. This post is focused on the most common WordPress errors and how you can rectify them. Most of the WordPress beginners find it very difficult to set up WordPress and get started with their blog by themselves.
If you are also going through a similar difficulty, then it is time for you to get some knowledge of the most common WordPress errors. Make sure that you are exploring different guidelines online so you can easily get rid of all the WordPress errors.
It is always necessary for you to understand the fixes for the common errors so you can easily rectify these errors and make things easier for yourself. We have listed multiple common errors that most of the new users face. Let’s have a look at how you can fix these errors without going through any difficulties.
How to fix Syntax Error in WordPress
If you are new to WordPress and seeing this specific error, then you can easily solve this. Syntax error usually occurs when you are trying to add a code snippet in the code files of your website and end up missing something or adding incorrect syntax. If you have made a mistake while adding a code snippet, then you will end up seeing a PHP parse error which will look like this:
Parse error- syntax error, unexpected $end in /public_html/sitex/wp-content/themes/theme-name/functions.php on line 296
This means that the code you have written is either incorrect or has some missing values in it. To eradicate this problem, you will have to correct the syntax. Here, we will be sharing steps to resolve this error.
Adding styles and making small changes is extremely common these days from the non-technical users since there are many guides and tutorials available out there. If you have done some changes in the code file from the tutorial and you end up seeing a syntax error, then you don’t have to worry at all. You can simply fix this error by going through few steps.
To fix this error, you will have to correct the code causing this specific error. You will have to use Filezilla (FTP client) to get into your website’s code files. Once you have installed the FTP program, you will have to connect it to your website.
If you have forgotten about the file that you last edited which caused this error, then you can check out the error itself where you will be able to find all the information you need. The error displays the file name and the line where you have entered the incorrect syntax.
Once you have found the file where you added the code, you will have to go to the exact line number that displayed in the error and remove the code that you added previously. If you don’t want to remove the code, then you will have to edit it and find the correct syntax in order for your website to work. Once you have made these changes, you will have to save the file and upload it back to the right directory.
After making these changes, you will go back to your website and refresh the page and you will be able to see a working website.
Fixing error establishing a database connection in WordPress
Another most common WordPress error that you will face is the error for establishing a database connection. Most of the people end up making this common mistake. If you are a newbie and you are trying out WordPress, then make sure that you are familiar with how you can fix this specific error. The error will arise during the WordPress installation and it clearly states that the website is unable to connect to the database.
If you are a beginner, then it will take some time for you to resolve this specific error. If you have not entered the correct database credentials including database host, database name, and password, then you will end up facing this error. Here is how you can fix this specific error.
You will have to note down the database credentials while setting up the database. If you have entered incorrect credentials, then you will see this error. However, you can visit the wp-config.php file to resolve this error. This is the file where you specify the details for WordPress to connect database.
You will have to repair the database by downloading the wp-config.php file using an FTP client. You can now open the file in the text editor and paste the following code at the end of the file:
define(‘WP_ALLOW_REPAIR’, true);
After doing so, you will have to save the file and then upload it back to your WordPress directory. Now visit your website with the following URL and you will see a message like this:

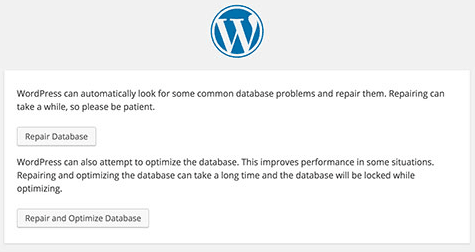
You can then click ‘Repair and Optimize Database’ button to fix the problem.
Once you have done the repair and fixed the error, make sure to remove that specific code snippet from the wp-config.php file because users do not require to be logged in while running the maintenance.
Fixing 504 Gateway Timeout error in WordPress
504 Gateway Timeout error usually occurs when you are using a proxy or firewall to access the website. When you request to your server through a firewall or proxy and it fails to connect with the upstream server, then you will be able to see this specific error. It usually happens when you are using a firewall on your website or a proxy.
You have must have received 504 gateway timeout error while visiting different websites. If you are receiving this error on your website now, then you can get rid of it by following a specific guideline. The error page’s message and appearance can be different depending on the WordPress hosting company. These errors could be stated as 504 Gateway Timeout, HTTP 504, Gateway Timeout error, and 504 error.
Here are few ways that you can try to fix this specific error.
Turning off the website firewall
If you are using a firewall like Cloudflare or Sucuri, then you can try turning it off to connect to the WordPress hosting server. You don’t need to disable the firewall completely. You can disable it temporarily. If this fixes your issue, then it means that your hosting server is blocking the firewall IP. You will have to contact the web host to remove the restriction of that IP.
Deactivating the WordPress theme or plugins
Another thing that you can try is deactivating the theme and plugins that you are using on your WordPress. It is possible that your web hosting service has a restriction for a specific theme file or plugin file. If that is the case, then you can ask your web hosting service to remove that restriction. It could be because of a specific code snippet in a theme file or a plugin file.
Cleaning up the WordPress database
If your WordPress database is corrupted, then you should consider cleaning your database and optimizing it again. You can use some plugins like WP-Sweep to clean up and optimize your WordPress database. It can also be one of the reasons why you are getting 504 gateway timeout error on your website. Whenever you are cleaning your WordPress database, you need to be sure that you are taking backup of your WordPress database.
Turn off the VPN
Sometimes you are surfing the web with the VPN turned on. If that is the case, then you should consider turning off the VPN to gain access to the website. If that is the case and the error message goes away, then it means your web hosting service is blocking the IP from that specific region. If you wish to continue using VPN to gain access to your website, then you can always contact the web hosting service about it and ask them to remove the restriction for that specific IP.
Wait and Reload
Sometimes it only delays due to many possible reasons. You can always wait and reload to get back on track. Most probably, if your website was working fine before using a proxy or firewall, then you should wait for a while and then try reloading your website as well. These are the few things that you can focus on to make things better for yourself.
Fixing WordPress white screen error
There are tons of common errors that most of the WordPress beginners face while using their website. If you are facing a blank white screen while using your website, then you don’t have to freak out because it is another common error that most of the new users face. This error appears with no error message and that’s the reason why it freaks out the newbies who are using WordPress for the first time. It usually happens when a specific script uses PHP memory limit while loading. If you are facing this error, then here are the ways to deal with the error.
To diagnose the problem, you will have to run few tests. If you have any other website running on your WordPress, then it will become a lot easier for you to compare the problems. Make sure that you are taking backups of your website before making any further changes to your website. Moreover, you should have backend hosting credentials or FTP client to diagnose the problems. Here are few things that you can do to resolve this error.
- This error can result due to the memory limit issue. Make sure that you are increasing the memory limit to avoid this problem.
- If you are using multiple plugins and your website does not have a high memory limit, then it can be a problem. Make sure that you are starting to troubleshoot by disabling all the plugins and then enabling them one by one if disabling them resolves the error.
- Your WordPress theme can also be a part of this error. Make sure that you are deactivating your WordPress theme and shifting to the default theme. If the issue is fixed after deactivating the theme, then you will have to check your theme’s functions.php file. If you see extra spaces at the end of the file, then remove those spaces and activate the theme again.
Fixing WordPress memory exhausted error
If you have just created a website on WordPress and you have started seeing memory exhausted error, then it means that a WordPress error or a plugin exhausts the default memory size limit. If this happens, you will be able to see the following error when you are visiting your website or uploading any plugin:
Fatal error: Allowed memory size of 33554432 bytes exhausted (tried to allocate 2348617 bytes) in /home/username/public_html/yoursite/wp-includes/plugin.php on line xxx
To fix this error, you will have to follow few easy steps. Make sure that you are following the steps carefully as you have to edit few code lines to fix this.
WordPress memory exhausted error is considered one of the most common WordPress error and you will be able to fix the error after increasing the PHP memory limit in WordPress. To fix this error, you will have to install FTP Client like Filezilla that will help you access the code files of your WordPress.
After accessing your WordPress files with the help of Filezilla, you will have to download the wp-config.php file and edit it with the help of a text editor. Once you have opened this file, you will have to add the following code at the end of the file.
define( ‘WP_MEMORY_LIMIT’, ‘256M’ );
Once you have edited the file after adding the code, you will have to save it and upload it back to the WordPress directory.
Now you can visit your website and you will be able to see a working website.
However, you should know that if this act does not resolve your issue, then it is probably because the web hosting service provider does not allow you to increase the PHP memory limit. In such a case, you will have to ask the web hosting service provider to change the PHP memory limit manually.
How to fix image upload issue in WordPress
If you are facing issues with the images that you have uploaded, then you can easily fix that without any hassle. If you are a new user, then uploading images can be a little confusing. Sometimes users notice that the images in their website library are broken. Moreover, when they are uploading images from their site through media uploader, it gives an error.
If all of the files available in the media library are broken, then you will have to fix this common problem. The error usually occurs due to the incorrect file and directory permissions. There can be many factors involved in causing this issue. Here is how you can fix this specific issue.
Now that we already know the main cause of this error, we can easily rectify the problem. You should know that upload directory should have correct file permissions otherwise, you won’t be able to store your files in the WordPress database. To get rid of this problem, you will have to set the correct file permissions. You will have to install Filezilla which is an FTP client.
Now, you will have to connect to your website using Filezilla and you will have to visit the wp-cotent directory. Once you are in the wp-content directory, you will be able to see uploads folder. You will have to right click that folder and select ‘file permissions’.

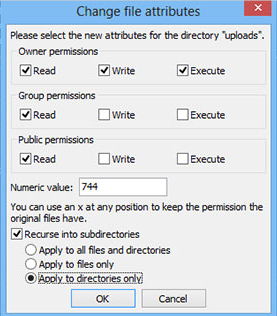
After clicking the option, you will be able to see a new dialogue box. First of all, you need to set file permissions for uploads directory itself and all the subdirectories as well. You can set it to 744. You will be able to see a box named, ‘Numeric Value’. You will have to enter the value in the box and check the box named, ‘Recurse into subdirectories’. After that, you will have to click ‘Apply to directories only and press the OK button.
If setting the numeric value to 744 does not work, then try entering the value 755.

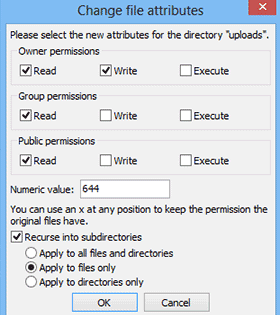
The next thing that you will have to do is to set file permissions for all these files in the uploads directory. You can do that by right clicking on uploads directory and select file permissions. In this dialogue box, you can change the numeric value to 644 as you did earlier. Now, check the Recurse into subdirectories and then click on Apply to files only button. Press the OK button to make the changes.
Fixing fatal error: Maximum Execution time exceeded in WordPress
Here is another common error that you will face while setting up your website on WordPress. As we all know that WordPress is mainly coded in PHP. Most of the web servers have set a time limit for PHP script running to avoid abuse. Whenever a specific script reaches the maximum execution time limit, it displays maximum execution time exceeded error. To fix this issue, you can follow the steps below.
You can easily fix this specific error by increasing the PHP memory limit in WordPress. We are going to show how you can fix this error by increasing PHP memory.
You should know that web servers require memory to run different applications simultaneously. Most of the server administrators allocate specific memory for different applications including PHP. If your WordPress code requires more memory than the default value, you will receive this error:
Fatal error: Allowed memory size of 33554432 bytes exhausted (tried to allocate 2348617 bytes) in /home/folderx/public_html/wp-includes/plugin.php on line xxx
WordPress increases PHP memory limit if it is less than 64MB. Here is how you can increase the PHP memory limit to avoid this error.
You need to edit a file named ‘wp-config.php’ which is available on your WordPress site. You will be able to find this file in the root folder of your WordPress. You can use Filezilla for making edits to this file.
All you need to do is to add the following code at the end of the file and save changes:
Define ( ‘WP_MEMORY_LIMIT’, ‘256M’ );
This code will help you increase the PHP memory limit to 256MB. After making the changes, you can upload this file back to your server and the error will disappear.
Important notes to avoid common WordPress errors
- Make sure that you are not using a nulled version of WordPress themes and plugins. If you are using a nulled version of a theme or a plugin, then you will end up facing a lot of problems as there can be code snippets in those files that will harm your website.
- If you don’t have the knowledge to add codes, then you should be very careful about editing the code files. You can always take help from a friend who has technical knowledge about WordPress. If you are using premium services from plugin developers and theme developers, then you should always consult them about the issues rather than making changes yourself.
- Get to know the restrictions from your web hosting server and try to remove those restrictions that will affect your online business.
- Make sure that you always keep your database clean and optimized so you can avoid all the errors related to the database. Moreover, you should always take regular backups of your website so you don’t have to face many issues.
Conclusion
There are tons of small common errors that you will end up receiving when you are working with WordPress. However, you don’t have to freak out at all. You can easily handle your WordPress website and resolves all the errors that you are facing. Make sure that you are doing troubleshooting first and then focusing on finding the fix to resolve the problem.